Adobe Photoshop is one of the most powerful tools you can have as a digital creative. It allows you to do so much editing, manipulation, and customization to your images. It’s so powerful that even the best of the best in the industry swear by it.
However, it has so many tools and customizations. There’s so much to learn! How can a beginner even know where to start?

Here’s one of the best Photoshop tutorials that will help you get a better grasp of what Photoshop is and what you can do with it.
- Get 65% off Adobe software – Follow our Adobe Creative Cloud discount guide.
- Get 10 Free Stock Images from Adobe Stock — Royalty-free photos, illustrations and videos
Adobe Photoshop Tutorial – Overview
- What is Photoshop?
- System Requirements
- Photoshop Workspace
- Layers in Photoshop
- Animation on Photoshop
- Pros of Photoshop
- Cons of Photoshop
- Frequently Asked Questions
- Key Takeaway
Let’s get started!
What is Photoshop?
Like most Photoshop tutorials for beginners out there, we’ll start our discussion with what exactly is Photoshop.
Adobe Photoshop is a software application that allows you to edit, manipulate, and retouch images. It allows you to resize images, blend them, and create surreal masterpieces.
If you’re more into graphic art, the application also allows you to draw or paint your ideas. Photoshop provides you with a few default brushes that can help you start your graphic art journey. If you want different brushes, you can always download them online and import them into your application.
Aside from all that, Photoshop can also help you explore 3D art. With a click of a few buttons, you can turn almost any artwork into a 3D object, You can then fully customize the artwork to suit your needs.
As Adobe claims, “If you can dream it, you can make it with Photoshop.”
System Requirements for Photoshop

Photoshop can run on relatively low specifications if you’re going to do light editing. But if you’re going for more intensive editing and will be working with lots of layers, you’ll need a more powerful computer to run it.
According to the official system requirements for Adobe Photoshop, you’ll need a processor with at least 64-bit support. It doesn’t really matter if your processor is Intel or AMD. This also applies if you’re using macOS.
As for the RAM, the minimum requirement is 8GB but it’s better to have at least 16GB for more complicated artworks. When it comes to GPU, if your device has DirectX 12 support and a 1.5GB memory, you’re good to go. It’s better though if it has 4GB of GPU memory.
As for the other specifications, here’s a summary according to Adobe’s official website.
The Photoshop Workspace
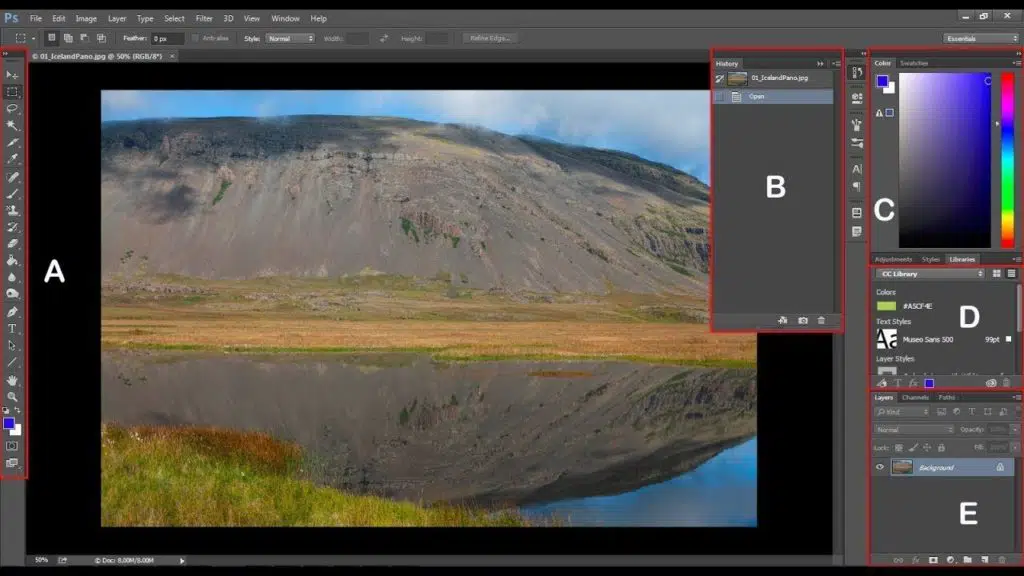
One of the first things you need to learn about Photoshop is how to navigate your way around the default workspace.
To make sure that your Photoshop is in the default workspace, look at the top right of your screen. You’ll be able to see a drop-down option that says “Essentials”. If you don’t see this, just click on it and select Essentials.
In future articles, we will be having Adobe Photoshop tutorials that discuss other workspaces. For now, let’s focus more on the default workspace.
Document Window
Photoshop allows you to open multiple images at once. This helps a lot if you’re a creative who is working with a lot of images.
If you’re opening multiple images at the same time, you can navigate your way around them through the Document Window. Your images will be displayed like tabs on a browser.
In the “tab” of your image, you’ll be able to see information like file type and the current zoom level.
Tools Panel
The tools panel is located on the left side of the screen. This is where you’ll see all of the tools that you’ll be needing for your project.
Selection Tools
These tools allow you to draw a selection in your image or artwork. Some of these tools allow you to select in squares or rectangles while other tools allow you to select by drawing your own shape.
Type Tool
This is how you’ll add text to your project. You can select to add your text vertically or horizontally. You can also choose to make your text a mask.
Shape Tool
If you’re looking to add shapes to your project, this is the tool you need. This tool allows you to draw predetermined shapes. You can customize the size of these shapes to fit your needs. If the shape you need isn’t available in the options, you can always use the Custom Shape Tool and draw your own shape.
Color Picker Tool
This tool helps you select the color for other tools. For example, it helps you select the color of the Brush tool.
Once you click on this tool, you’ll be able to pick out the color you need. You can choose the color, shade, intensity, and vibrance with the spectrums included. If you’re color matching, you can input the values for RGB, HSB, and CMYK, or input the Hex code.
Layers Panel
All of the layers of your current project are visible in this panel. With this panel, you’ll be able to customize the Opacity and the Blend Modes. You can also choose to lock and unlock layers here.
How Layers Work in Photoshop
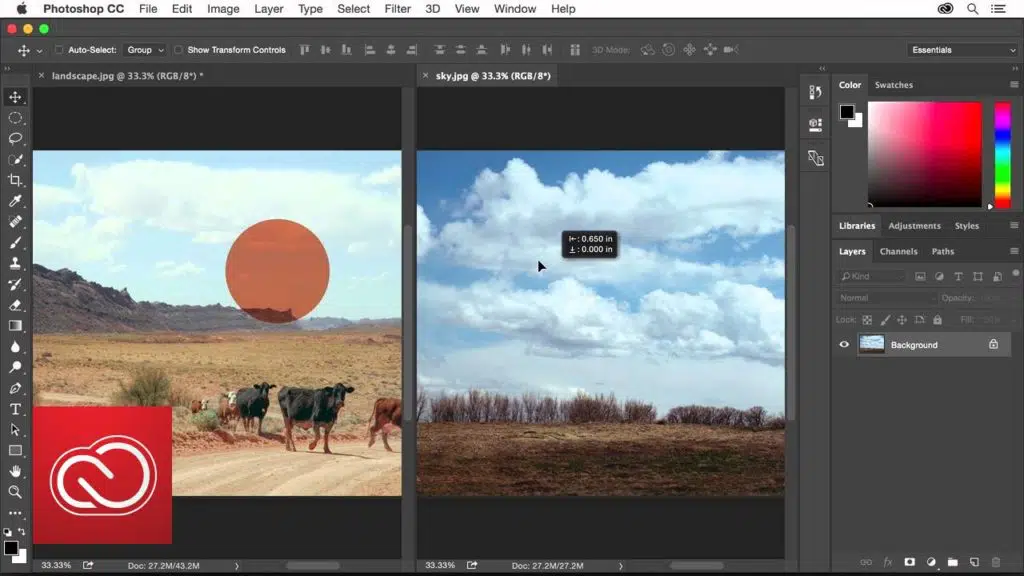
Layers are one of the most useful tools in Photoshop because it allows you to section your work. It allows you to work on isolated sections so when you need to make changes, it doesn’t affect the whole project.
Think of it as stacking images on top of each other. The ones on the top are the ones you see more and the ones below are more like the background of your project.
As a beginner, it can be confusing to understand and appreciate how layers work. It may seem unnecessary and tedious to work with. But as any professional will tell you, layers can save you tons of time and effort in completing your artwork.
Practical Example
The best way to explain this is through a concrete example.
Imagine you’re a digital artist and you were commissioned to draw a person. On the first layer, you start out with a rough sketch of the person’s pose. On the layer above that, you add more definition to the body. On the layer above that, you add the person’s outfit.
Once you’re satisfied with it, you proceed to do the line art. You then color each element on separate layers.
On a classic paper, you’ll be doing all of these illustrations on just the paper. If you make a mistake, erasing one part can damage the other parts of your artwork.
With layers, you’ll be able to isolate the changes on that specific layer. You’ll get to edit your project without affecting the other parts.
Animation on Photoshop
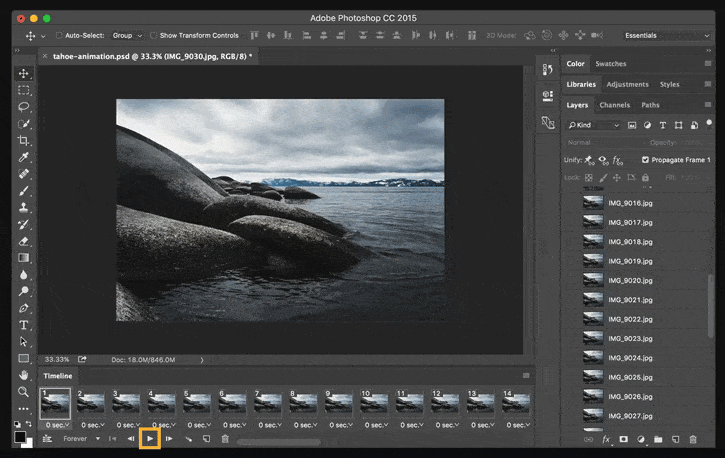
Surprised? Yes, Photoshop also allows you to animate much like Adobe Animate. A lot of users are not aware of this because there are limited Photoshop animation tutorials online.
Photoshop helps you create frame-by-frame animation using its Timeline panel. To access this, click on the Window option on your Menu bar. It’s located at the top of your screen. In the options, choose the Timeline.
A panel titled Timeline will now appear on the bottom of your screen. To begin animating, you need to click on Create Video Timeline.
On the left part of the Timeline panel, you’ll be able to see the buttons that will help you accurately navigate your way around. These include playing the animation, moving frame to frame, and going to the first frame.
It’s important to note that the layer system still applies in this Timeline panel. What makes layers different though is that in the Timeline these layers are considered as frames. This is where you’ll be drawing your animations frame by frame.
Once you’ve added your second layer, you can drag it down next to your first layer in the timeline. Photoshop will now then group these layers together in a Video Group. As you add more layers, they will automatically be added to this current Video Group.
If you want to make it easier to create more seamless animations, click on the three lines located at the top right of the Timeline Panel. In the list of options, click on Enable Onion Skins. This feature allows you to see your previous drawing as you draw your next one on the next layer. Think of it as using a lightbox that animators use to create sequences that flow smoothly.
Pros of Photoshop
Advanced Features for Creatives
Photoshop is known for having a wide plethora of tools that help different kinds of visual creatives bring their imagination to life. There are a lot of tools for photographers that can help correct, retouch, and enhance their photos. There are also tools for graphic artists that will help them draw, paint, and even animate.
Professional Color Grading
A lot of professional photographers use Photoshop to color grade their photos. Because Photoshop breaks down its editing to smaller processes with various tools, it’s easier to fully customize color grading. It also allows you to make edits specifically and accurately by allowing you to input exact values in the changes.
Photo Manipulation is Easy
If you want to change the size or shape of an image, Photoshop has multiple tools to help you do this. For changing the size, there’s the Transform tool. If you want to freely shape an image to your liking, there’s the Warp tool. If you want to seamlessly add an image into a different image, there’s the Gaussian blur.
There are tons of other tools that will help you manipulate your images.
Supports Graphic Tablets
Most people think that graphic tablets are only used by graphic artists for digital drawing or painting. In reality, lots of photographers also use graphic tablets when retouching photos. It’s easier to select and correct spots and blemishes when using tablets for graphic design.
So whether you’re a graphic artist or a photographer, Photoshop makes it easy for you to create artworks by supporting graphic tablets. Usually, programs that support tablets don’t have photo editing capabilities so Photoshop really stands out by having all of these in one software.
Layer System
Layers help you separate your work into different parts. The advantage of working in parts is that when you make a mistake, it’s confined to only that part. You won’t have to redo everything again just to correct a mistake.
Available on Multiple Operating Systems
Photoshop is available in Windows, macOS, and iPadOS. This allows you to work on your project on different kinds of devices. You can bring it anywhere and on a wide variety of devices.
Cons of Photoshop
Complicated
As much as having a wide plethora of tools is a pro, it’s also a con. Since all of the actions in Photoshop can be highly customized, sometimes simple processes can require lots of steps to achieve.
For example, if you’re using a phone and want to edit a photo, you can just add a filter and you’re done. In Photoshop, there are a lot more steps involved in this. You need to color correct first, adjust the exposure, adjust the white balance, and then proceed to color grading.
Another factor that makes Photoshop complicated is that there are so many ways to do one thing. The tools in Photoshop give you multiple ways to achieve the look that you want for your work. As a beginner, this may seem intimidating and downright confusing.
Steep Learning Curve
Photoshop opens up so many possibilities for creatives. Despite that, if you’re a beginner, you may have to invest time and effort into mastering the program. A lot of first-time users report that the program is very confusing and can sometimes find it overwhelming since there are a lot of tools.
Subscribing to the Program is Expensive
Subscribing to Photoshop starts at $20.99 USD per month. If you’re going to get Adobe’s Creative Cloud which includes all of their apps and more, the subscription starts at $74.49 USD.
But if you’re a student or a teacher, you can get up to 65% off on Adobe’s Creative Cloud. Therefore, instead of paying $74.49 USD per month, you only need to pay 49.99 USD per month. You can also get Photoshop on discount for as low as $9.99 USD per month.
Frequently Asked Questions
How do I rearrange layers in Photoshop?
As discussed earlier, the arrangement of layers is important. To organize your layers, all you need is to drag the layer to your desired position. Once you’re sure of its position and don’t want to accidentally move it, just click on the lock icon. To unlock it, select the layer and click on the lock icon again.
How do I unlock the background layer in Photoshop?
There are a lot of ways that you can do this. One of the easiest ways to do this though is to simply duplicate the layer and delete the original one. Just drag the background layer to the Create a new layer button and delete the background layer. The new layer will be named Background copy and you can just rename it as background if you wish.
Where can I see the images that I just added to my current work in Photoshop?
When you’re working on photo manipulation, sometimes the photos you add to your work can get lost. So you just imported a new image but you can’t see it? Then it’s probably buried in layers that are blocking your view.
What is a smart object in Photoshop?
A smart object is a non-destructive layer because any edits you make to a smart object can be reverted. This means that you can make as many edits as you want without affecting the original data.
Why can’t I see the drawings, edits, or erasures I made on my image?
First of all, you have to check if you performed these actions in the right layer. The reason it may not be showing might be that you made the changes in a different layer. Secondly, you have to check if there’s anything above the layer you’re working to see if that’s blocking your view. Thirdly, maybe the layer is locked? You can’t make changes on a locked layer so make sure you unlock it first. Finally, check the tool you’re using. You may be using the wrong tool and so you don’t see changes.
How do I resize my images without distorting them?
There are a lot of ways to do this but one of the quickest ways is to use keyboard shortcuts. Select the image you want to resize and press on CTRL + T or Command + T. This is the shortcut key for transform. Using the corner, press on shift while you drag the image to your desired size. Pressing on shift will retain the proportion of the image and avoid warping.
How do I color match perfectly?
Click on the eye-dropper tool and click on the color you want to copy. This tool will give you an exact match of the color you select.
What does the Clone tool do?
The clone tool will use your current brush to copy a part of your image to another part of your image. You have to select where the clone tool will be copying from. As you paint over another area of your image, the clone tool will copy the previously selected area on the new area. This can be used to repair problem areas in photos and pictures.
What is a Gaussian blur?
Gaussian blur is a tool that helps you make images blend more seamlessly into your background. This will smoothly blur your image or the edges of your image so it looks more like a part of its background.
Photoshop Tutorial Summary
Photoshop can be overwhelming at first because there’s just so much to learn and so many possibilities to explore. There are so many tools to discover, understand, and ultimately master. There are so many settings to adjust and play with till you find your signature style.
Admittedly, mastering this application software takes a lot of time, perseverance, and energy. But at the end of the day, if you do get to master it, you’ll be on the same level as the professionals. It may take time but it’s definitely a worthwhile skill to invest in.
Whatever kind of creative you are, Photoshop always has something to offer to help you explore, master, and perfect your craft.
Related Posts:
- Download Adobe Photoshop
- How much is Adobe Photoshop and Illustrator?
- Best Photoshop Text Effects to Download
- Best Free & Professional Photoshop Brushes
- How to get an Adobe Photoshop Student Discount
- Best Weather Photoshop Brushes
- Best Photoshop Alternatives
- High-Res Watercolor Brushes for Adobe Photoshop