
This article has been contributed by Bunty Singh.
You’ve spent time and money on a fantastic photoshoot – complete with model, a perfect location and even great weather.

But when you get back to your studio and start editing, you discover that your photos are underexposed and the colors aren’t exactly what you were hoping for.
But that’s exactly why we have Photoshop!
In this tutorial, you’ll learn how to bring a balanced exposure and coloring to images using a range of techniques in Photoshop. I’ll show you how you can target highlights and shadows using Blend If to limit the effect of Adjustment Layers.
You’ll also learn how you can use blending options to blend Adjustment Layers effect in no time, using a Adobe Camera Raw filter to target specific tones, pull more details from shadows, and finally adding a warm tone to shadows using split toning in Photoshop.
Without further ado, let’s get into it.
Related: The best Adobe CC Deals – Get 40 to 70% Off
Step 1 – Open Image
First, open your image in Photoshop. Go to File > Open and select your image.
You can download the image that I am using from Unsplash if you want to follow along with me.
As you can see below, the image is on the side of underexposure, highlights are dim, there’s not much detail in the shadows and the colors look muted.

We’ll fix the exposure by lifting the shadows and boosting the highlights without compromising details. We’ll add more saturation to make the colors pop in our image.
Step 2 – Lift Shadows With Curves
To lift the shadows we’ll use the Curves Adjustment Layer. This is my favorite Adjustment Layer to target shadows, highlights and midtones.
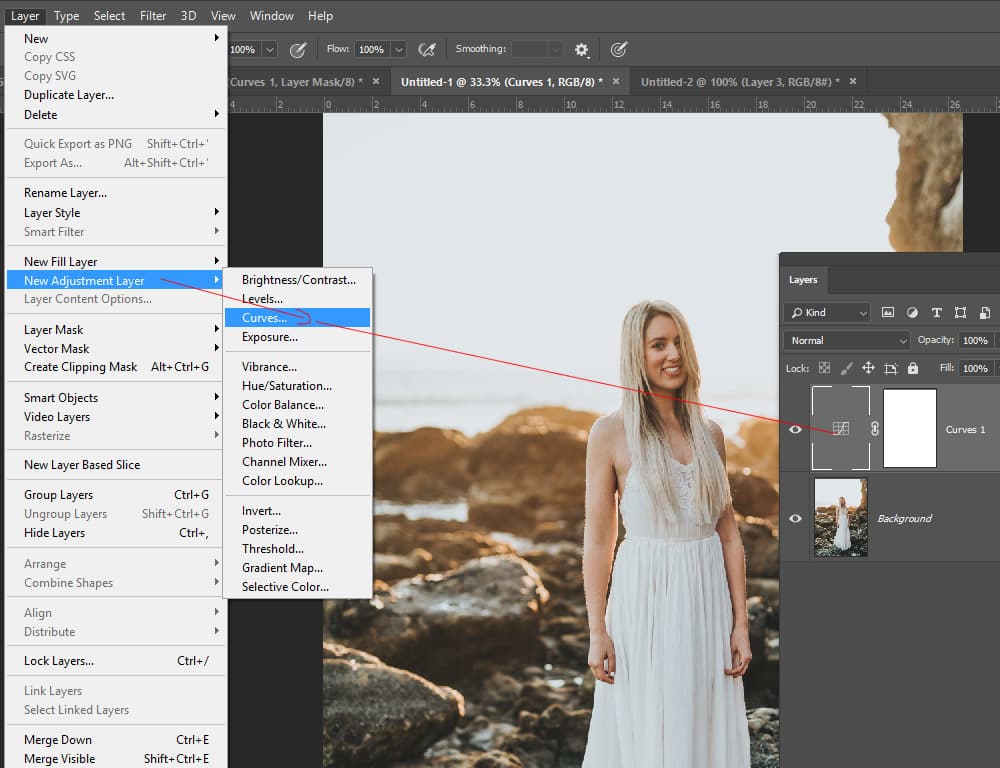
To create a Curves Adjustment Layer, go to Layer > New Adjustment Layer > Curves, as shown below.
In Curves, details are represented by a diagonal line which you can see in the image below. Basically, the image’s tones are altered depending on where you add a point.
As you can see, I have added a point in the middle of the line and lifted it to increase the brightness of the entire image. My aim here is to lift shadows and add more info to the shadow region of the image. By adding a point in the middle, not only I am lifting shadows but I’m also affecting highlights as well.

You can experiment by adding a point in the bottom left, or top right, then bring the line up and down to increase and decrease the brightness of the image.
Step 3 – Blend Layers With Blend If
Now, let’s limit the effect of Adjustment Layers to shadows and highlights using Blend If.
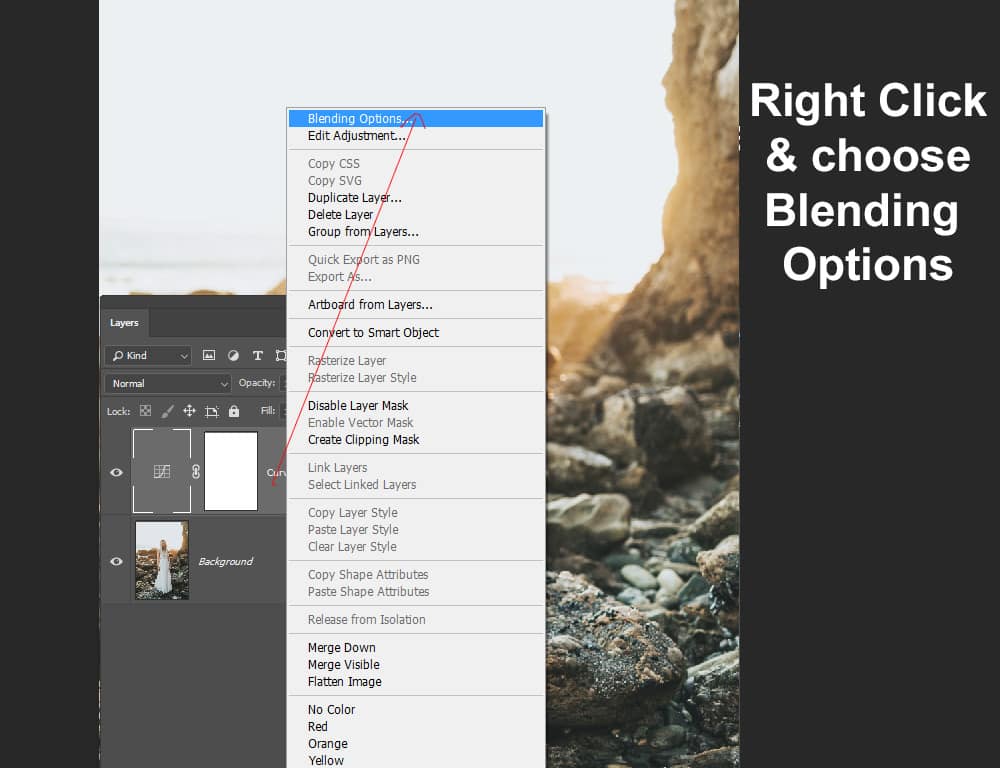
First, we need to access Blending Options. Right-click on the Curves Layer then click Blending Options as shown in the image below. Make sure that the Curves Adjustment Layer you have created is selected to avoid ruining the effect.
In the Blending Options menu, you’ll see an Underlying Layer slider. This slider tells Photoshop to blend the Curves Layer according to shadows or highlights. The arrow at the black end of the slider limits the effect to highlights and the white arrow restricts the effect to shadows.

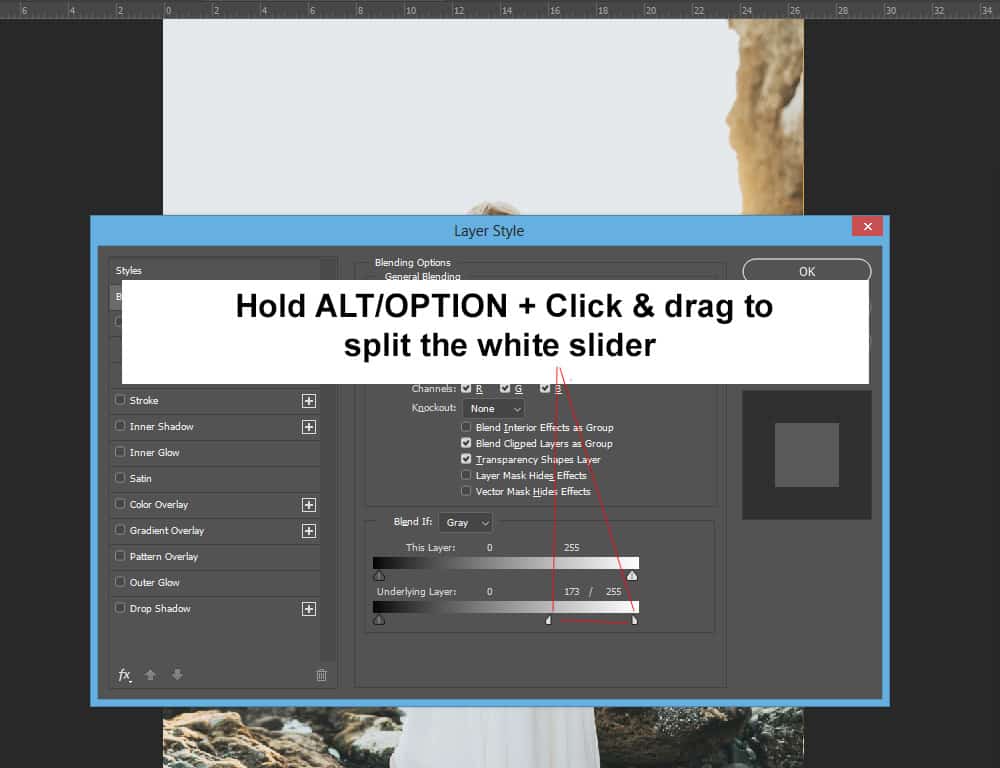
We need to split the arrows to make the transition of the effect smooth. You’ll notice that each arrow has a vertical line in the middle. Hold down the ALT (Windows) or option (Mac) key and click to move half the arrow, then drag it left or right.
Right now, we’ll split the white slider because we want the Curves to affect only the darker areas of the photo without affecting the midtones and highlights. Make sure you split the white slider as shown below.
Once you have split the slider, move the left half of the white arrow towards the black end of the slider. When you do this keep an eye on the image and watch how it affects the shadows of the image. If you notice that it is still affecting highlights then move the right half of the slider towards the black end as well.
I have done this in the image below, so keep an eye on the image to see what’s going on there and adjust the slider according to what you are seeing!

Here you can see we have more details in the shadows of the image, and thanks to the Blend If function, we’ve kept our highlights intact.

Step 4 – Add Color With Gradient Map
Now we’ll add coloring to the image. The best Adjustment Layer for coloring is Gradient Map, because you can select colors to be applied to shadows and highlights.
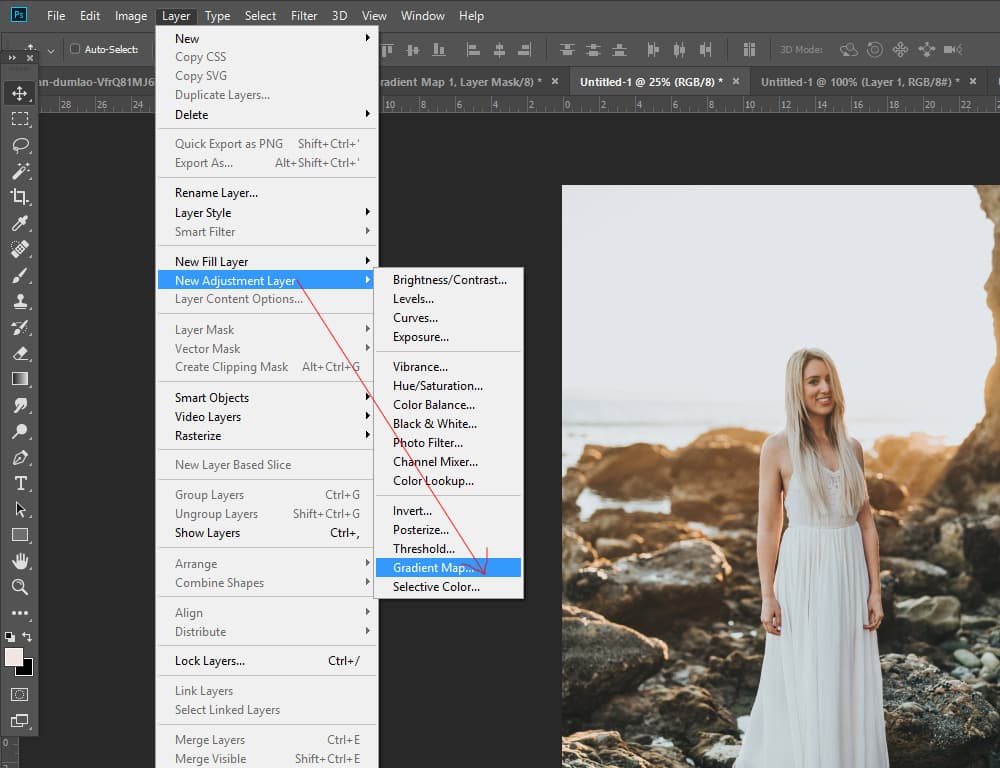
To create a Gradient Map Adjustment Layer, go to Layer > New Adjustment Layer > Gradient Map.
As you create a Gradient Map Layer, the Gradient Map dialog box will appear. From here, we need to access the Gradient Editor. To do this, click in the middle of the color bar as shown. The Gradient Editor dialog box will appear, where you can select colors for shadows and highlights.
As you can see, I have chosen a blue color for shadows, a warm color for midtones, and a bright orange for highlights as I want them to be bright and glossy. You can pick different colors to match your photography style. Just click on the slider and change colors from there.

Hit OK. You can now see the Gradient Map results in Normal mode.

Step 5 – Use Screen Blending Mode
To get the most out of the Gradient Map, use it with Blend Modes. Not only can Blend Modes give you a variety of results, but the function will blend color in a snap, saving you a lot of time.
I have changed the Blending Mode to Screen to brighten up the image with the colors that we chose.
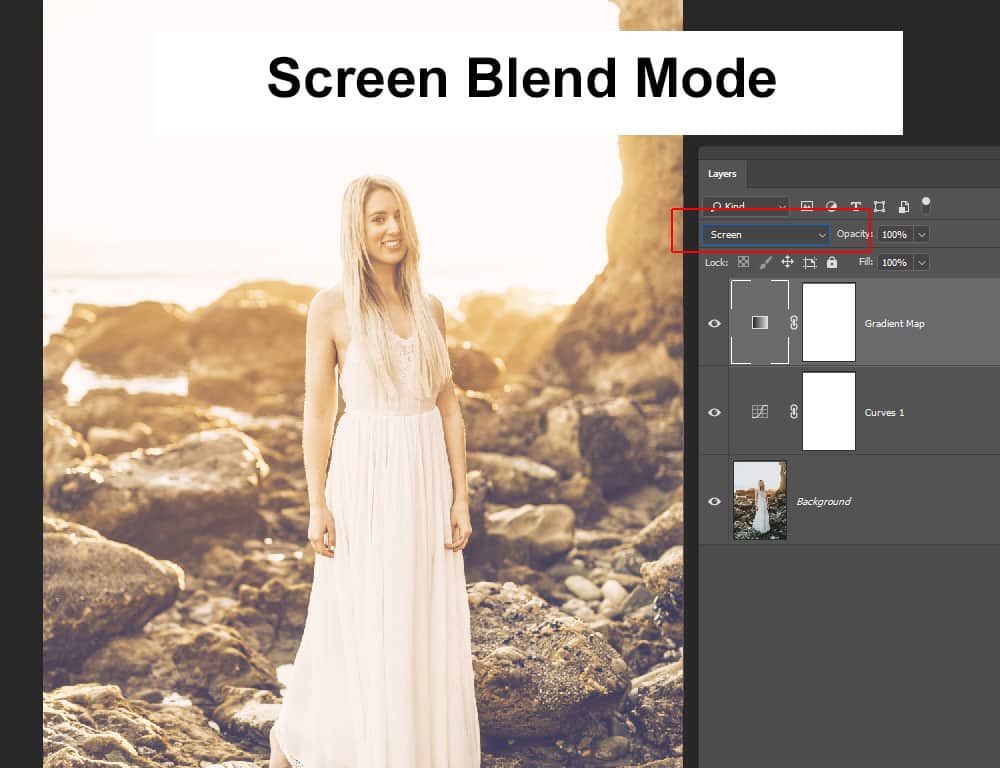
Screen, Color Dodge, Linear Dodge and Lighten Blend Modes will always brighten up the image no matter what color or Layer you use. If you want to learn more about Blending Options, check out this tutorial.
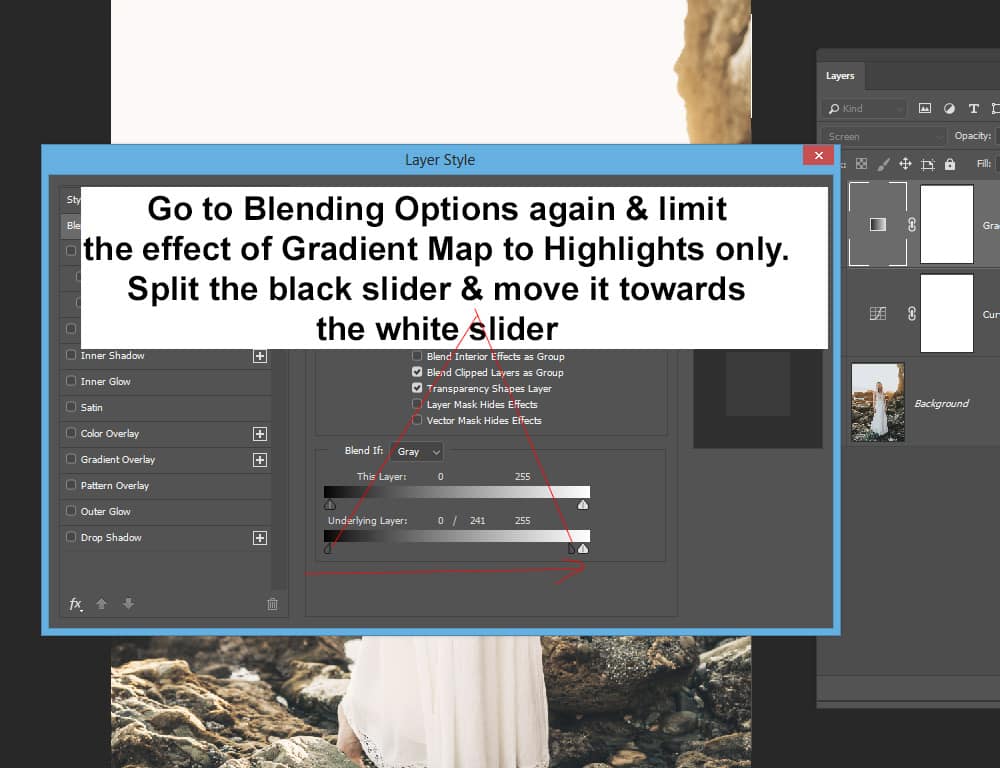
Now we’ll apply the Gradient Map adjustment to just the highlights in the image, which will add a sun-kissed coloring to the bright tones. We can easily achieve this using Blend If.
Right click on the Gradient Map Layer, then chose Blending Options. Go to the Blend If section. This time we’ll split the black arrow and move the right side towards the white end of the slider, as shown below.
Here you can see before and after results so far. Notice the improvements in the shadow details and the coloring in the image:

Step 6 – Make Skin Tones Pop With a Vibrance Adjustment Layer
The orange color in the image looks a bit muted so I want to increase the saturation of oranges. To do this, create a Vibrance Adjustment Layer by selecting Layer > New Adjustment Layer > Vibrance.
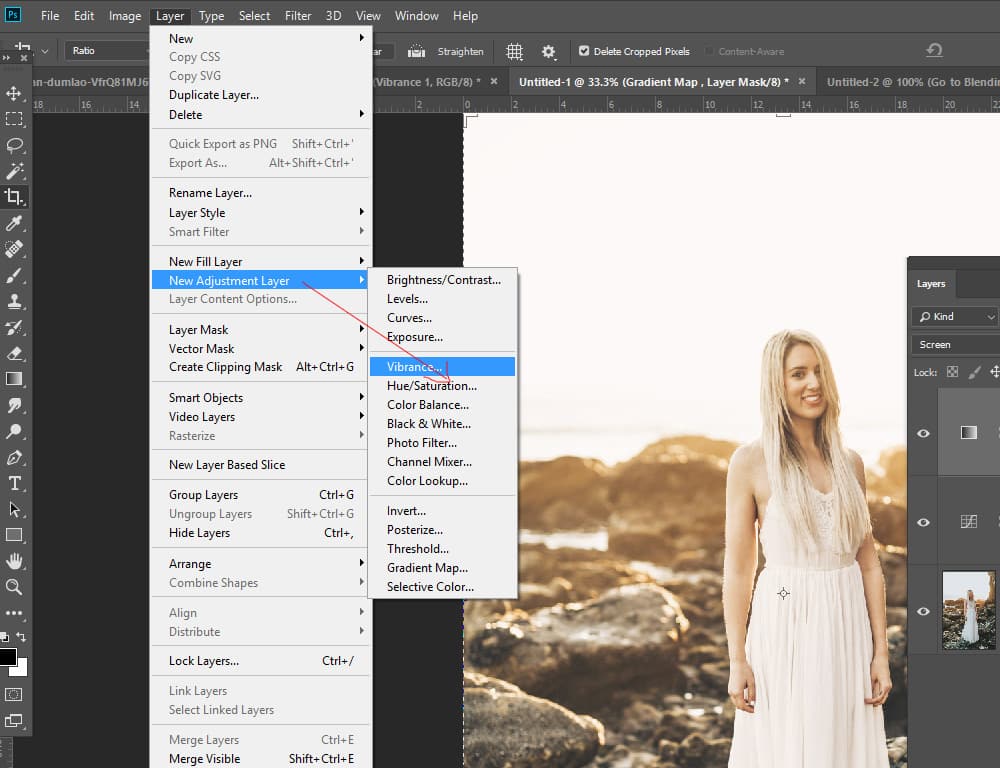
The Vibrance Adjustment Layer will generally affect only orange tones (i.e. skin tones) and won’t change any other tones. Use it if you want to make the color of skin tones pop.
Let’s increase the Vibrance level to +51 to add saturation to orange tones.

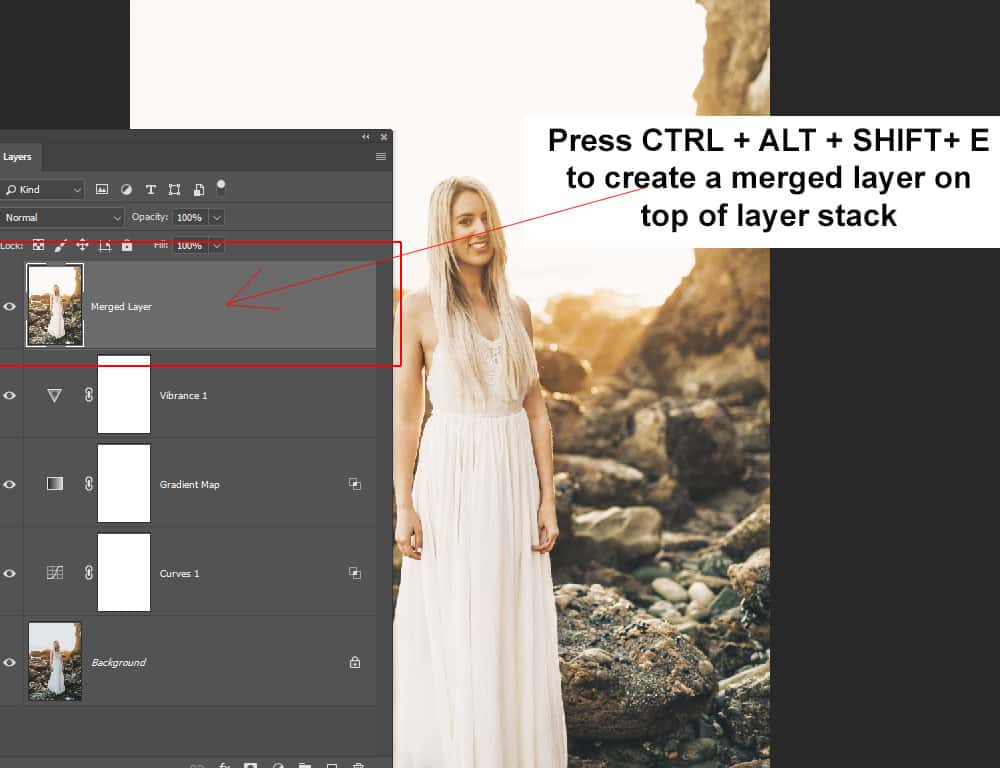
Step 7 – Merge Layers and Convert to Smart Object
Now we’ll use Adobe Camera Raw for further coloring and exposure improvements, as it’s one of the best ways to apply a number of adjustments to your image in just one go.
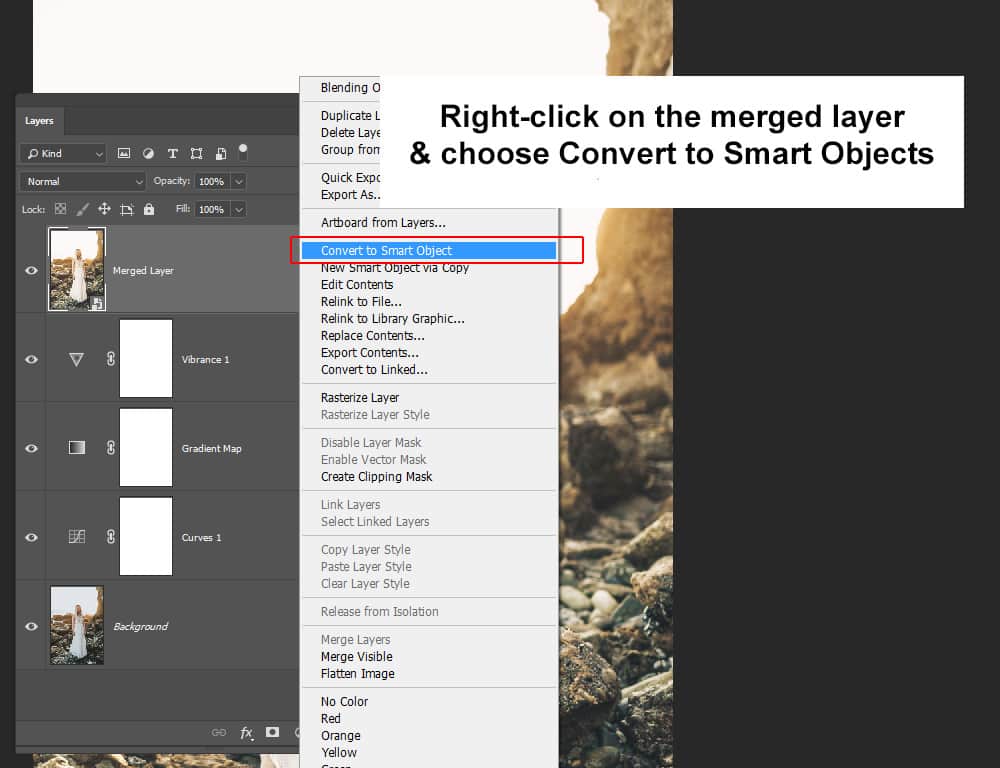
Before we use it, let’s create a Merged Layer. Press CTRL + SHIFT + ALT + E to merge all your layers into one. Your new Merged layer will appear at the top of the Layer stack. Name it “Merged Layer”.
Since Adobe Camera Raw is a filter, we want to convert our Layer into a Smart Object beforehand. It is always recommended to use Smart Objects before you apply any filter to your photos, as Smart Objects allow editing any filter at any time. This means you can go back and make changes if you are not happy with the settings that you applied.
To convert the Merged Layer into a Smart Object, right-click on the Merged Layer and click Convert to Smart Object.
Step 8 – Apply the Adobe Camera Raw Filter
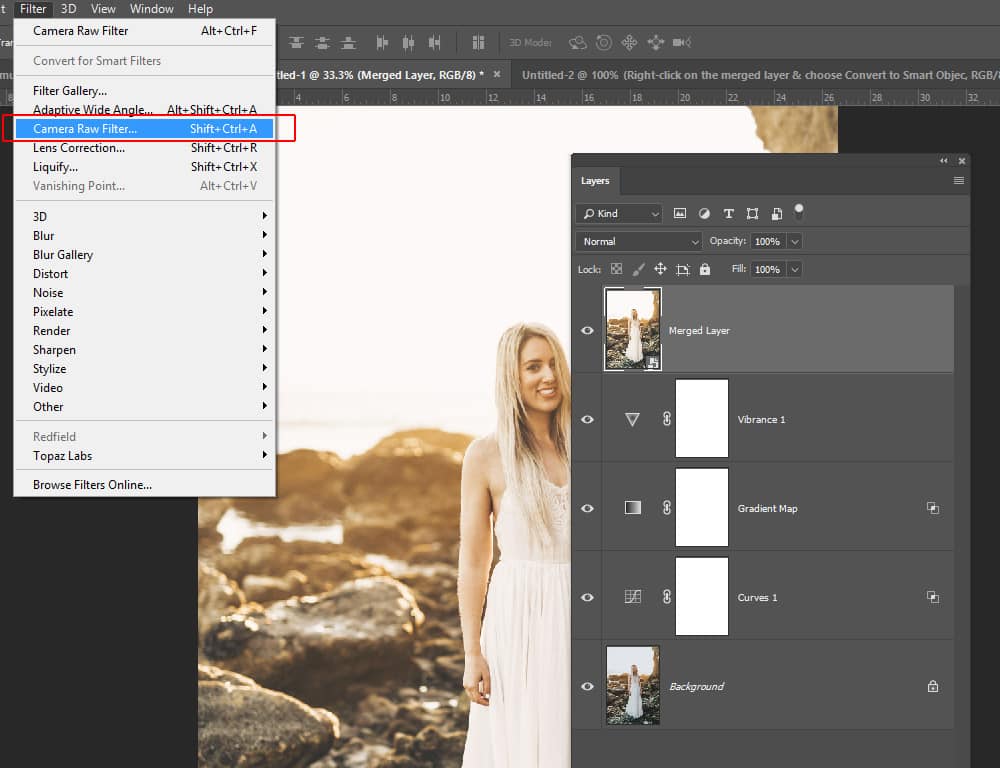
Now, let’s apply Adobe Camera Raw. Firstly, make sure you have the Camera Raw Plugin installed on Photoshop and it’s a default plugin. (If you don’t see it in the step below, you’ll probably have to install it.)
Go to Filter > Camera Raw Filter or you can press SHIFT + CTRL + A to activate the filter.
In the Basic Tab, I have increased the Contrast level to +21. I also increased the Shadows to +18 to bring more brightness to the shadows. You can make a lot of other changes here, like adjusting exposure, highlights, whites, blacks, saturation levels and much more. When you make changes always keep an eye on the image otherwise you might destroy the details of the image.

Step 9 – Adjust Sharpening and HSL
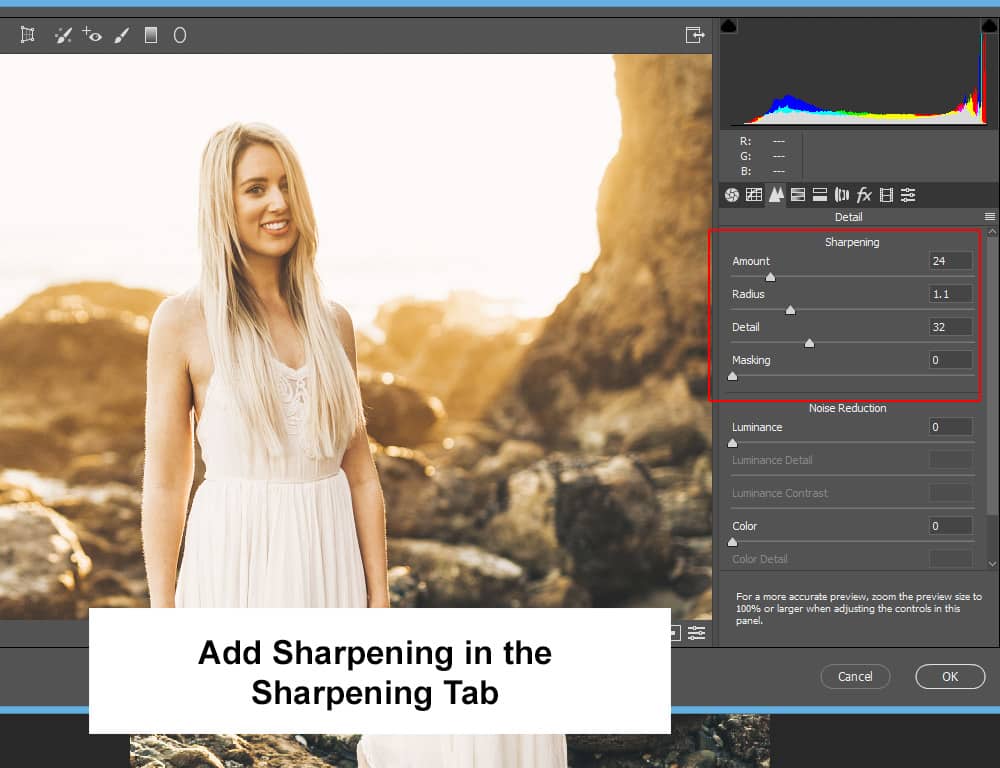
Next, let’s go to the Sharpening tab. I have adjusted the Sharpening Amount to 24. If your image lacks sharpness or looks blurry, you can use this tab to make your image details crisp and sharp.
In the HSL (Hue, Saturation and Luminance) tab, I have changed the saturation level of various colors. I increased the yellows because I want this color to be more saturated than other colors. I also reduced the blues because I don’t want any blue color, and I carefully reduced orange to remove just a bit of saturation from the model’s face. I reduced aquas as well.
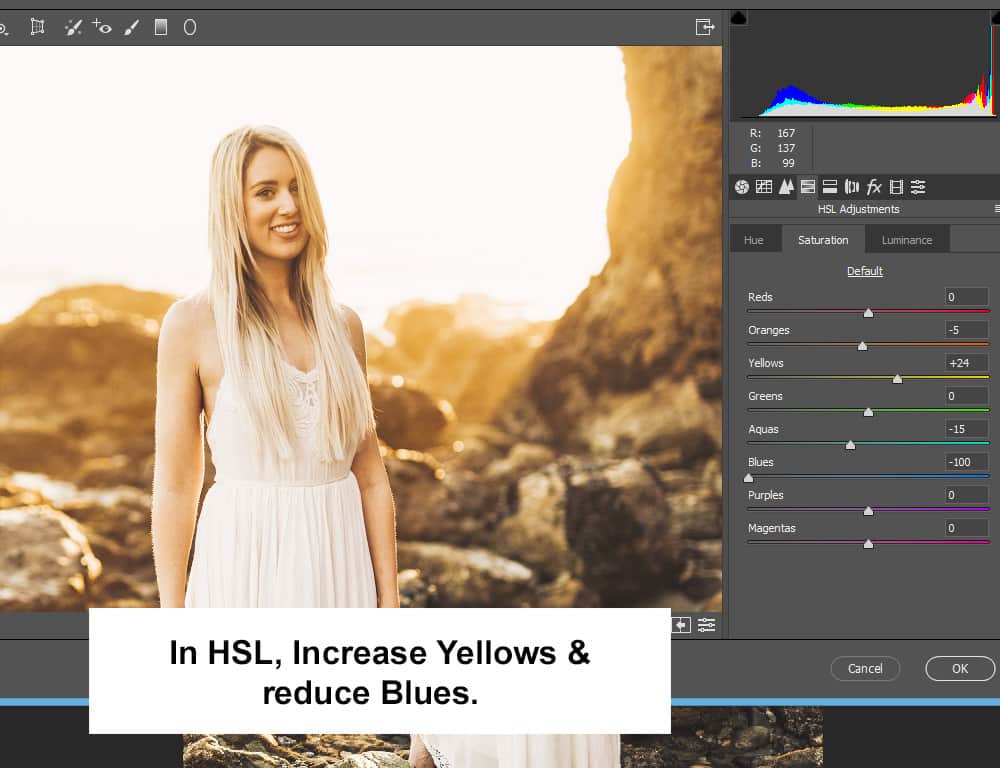
It’s important to mention that if you are working on a portrait image, be careful when you adjust the orange settings in the HSL tab. This will affect skin tones and most of the time you probably won’t want more saturation in the skin.
Step 10 – Add Warm Tones With Split Toning
Finally, let’s add some warm tones to the shadows using Split Toning. You can use Split Toning to add colors to highlights and/or shadows. I decided to add color to shadows only because we already have bright colors in the highlights. Of course, you can play around with the settings and modify settings for your images.

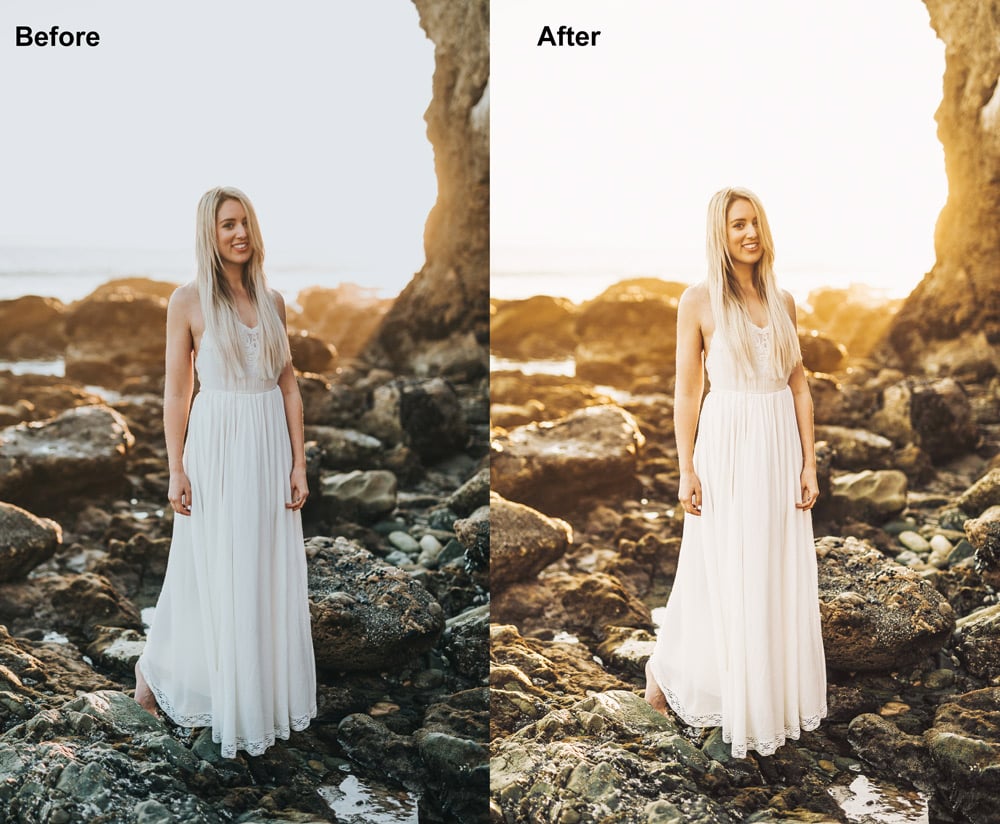
Final Results
And here we have it – our final edited image:

Below, you can compare the before and after results from step 1 to step 10. Notice the major improvements we have achieved, such as bright coloring, lifted shadows and beautiful sun-kissed coloring.
I hope you enjoyed the tutorial and if you have questions let us know in the comment section below.
_
About the author: Bunty Singh is a digital artist and programmer who loves to write Photoshop tutorials and write code.